|
|
 |
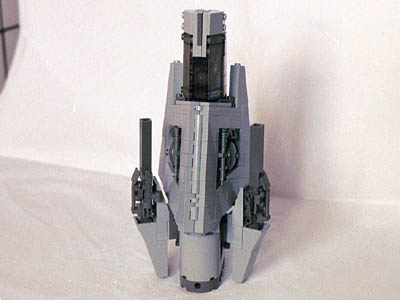
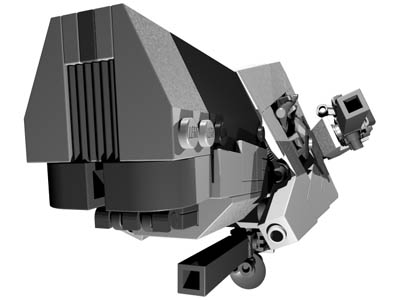
Shark 2Finished 11/5 2005, Pieces 344, Steps 82 |
A challenge: The 60 Horn was pretty well received at CSF, but as usual there were complaints about visible studs and lack of a landing gear. So I thought: what the heck, lets try to make something
studless, with a working landing gear, a lot of greeble, in my personal
style with a lot of odd shapes and angles. Carapace: So I started out with playing around with
some slopes to find the least rectangular shape I could for the back
shield/carapace. |
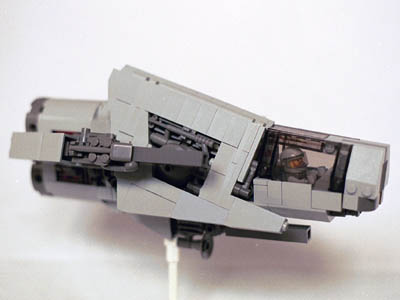
Cockpit: Next problem was to make a windshield,
since TLC hasn't made anything that would fit the narrow pointy shape of
carapace. |
Engine: After creating a cockpit, I fastened it to a beam and
put the carapace on top. But after pondering over this for a while, with only a vague idea of how to fasten the carapace, and none of how to make the landing gear, I didn't really wish to make it anymore complicated than it was already. And that was when the Shark 2 was born, since I decided to make it into a small fighter, and inspired by Placodermi, ancient fishes from Silur and Devon with armour plating on the frontal part of the body, I slapped on a small Starwars style engine similar to the "oval" ones I'd made for my 44 Space P38, but with an open structure with panels that would allow greebles showing just below the surface of the hull. Descending: However finishing the model so abruptly caused a problem with the angles: I had this nice edgy funnel shape, but it only pointed forward (cockpit), outwards and backwards (lower edges of carapace), downwards (rear edge of the carapace), and with a single barren peak pointing upwards giving it a distinct mountain shape like the boring one in my model 04. |
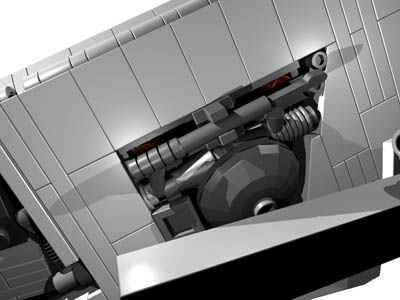
Guns: But as a fighter the model needed guns, and this gave me the opportunity to add something pointing the opposite way of the mountainshape: upward and outward. Here the top mounted engines of another funnel necked craft - the troop transport from the old Starwars flightsimulators was a great inspiration, although I placed them a lot lower so that a) the (much reduced) peak/dorsal fin was still visible, and b) the gun arms were well connected to the central part of the craft. The guns themselves were a pretty interesting build, where I was pleased to have the opportunity to use those lame 1x1x5 bricks, and it was fun to construct them in a way that made them look like they were sticking out of a very thin hull like the engine, and hiding the internal tubework of the surrounding slopes in a way that made them look like they were suspended freely. Inspired by the small air intake on the bottom of the Shark Gunship, I added a third gun below the craft to form a triangular pattern that could balance the two above. This however made the landing gear much more difficult: |
Gear: With the two stud wide and very low reaching gun, it was a special challenge to make a landing gear that was tall enough, while still able to fit beneath the carapace. Pretty early in the building process I had my eyes on this particular construction because the bend technic piece fitted the edge of the carapace so well. The problem was the fact that the attachment pin had to be placed off center toward the nose, while most of the weight is located in the engine (and middle) section. This meant that about 90% of the weight was located behind the pin, and it naturally couldn't keep that up. So I tried to figure out another
type of gear for a couple of weeks, but wasn't able to come up with
anything else that could actually fit beneath the carapace. Much later I got the idea to place a couple of small grey pins the gear could hang on: you just pull them out slightly and release them over the pin, and the gear will stay there until you pull them outwards again. Animation of the gear unfolding
Guts and With the outward constraints roughly in place it was time to start
building the interior, and figuring out how to attach the carapace. It
took a while to figure out something that could both keep the carapace
together and tilt it into position, without showing on the outside. The
rear connection keeps things together while the pins in the front just
keep the angle. Up until this point the carapace was actually only a frame of slopes, since I hadn't found a good surface: it was just too big to be a plain grey surface. I tried making some mosaics, but that just didn't work, so I had to make the open section with greebles, which annoyed me a lot because the gun and greeble tend to blend together making both harder to see. On hindsight it probably wasn't that bad after all, and I'm pretty satisfied with how the greebles turned out, especially the fact that I managed to fit in the binocular pieces in an angle that could fill the narrow corner: they're kept in place by the dark grey 2x2 brick. |
Aesthetics: Originally the line of the cockpit and
carapace was pretty much straight. During the process of fitting the elements together this inspired me to raise the peak of the carapace much steeper giving the craft it's cute turned up nose while at the same time giving the craft a distinct shark look by giving a hint of an open mouth together with the side prongs of the carapace. I'm actually amazed how this duality between cute and rough continues throughout the craft with a cute nose vs sharky carapace and the rounded belly vs guns and carapace. Like a mixture of a hedgehog and a shark. So all in all I'm very satisfied with it, tried a lot of new things with success, and it turned out to be one of my very best models. Want to see a 360 degree view of the
model? Here's a big rotating animation |
 Fuzzy?
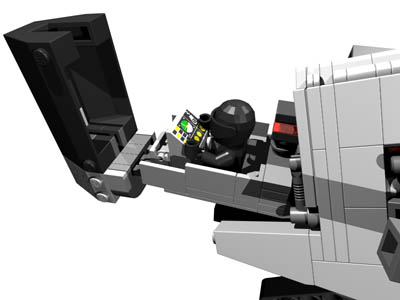 Second
version of the cockpit: the first one was much stronger, but the hinge
structure ate too much space.
Second
version of the cockpit: the first one was much stronger, but the hinge
structure ate too much space.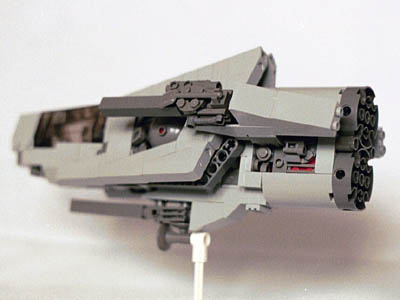 Gear folds up neatly behind the shield
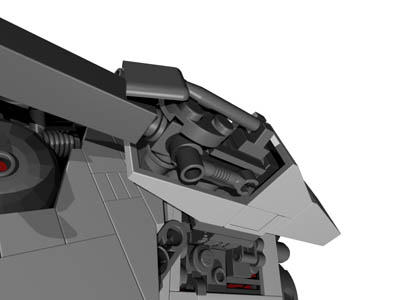 Note
how the dark grey gun seems suspended freely within the thin hull, able to
correct against dodging targets.
Note
how the dark grey gun seems suspended freely within the thin hull, able to
correct against dodging targets. Gear unfolded
 Note
the little grey pin just below the rear attachment of the carapace: that's
the one the gear hangs on when folded.
Note
the little grey pin just below the rear attachment of the carapace: that's
the one the gear hangs on when folded. Note how neatly the 3 bricks wide canopy fits in with the
small panels on the side of the cockpit
Note how neatly the 3 bricks wide canopy fits in with the
small panels on the side of the cockpit
![]()